Sergio and the sigil

Rule "Previous releases of Microsoft Visual Studio 2008" failed

Posted by Sergio on 2010-03-07

Today I was trying to install SQL 2008 on my box and the setup stopped after checking a bunch of rules. The error message was the title of this post.

A quick search on the internet revealed that somehow the installer didn't believe I had VS 2008 SP1 installed, which I did. The recommendations in the KB article were kind of insulting. There's no way I'd spend hours of my day uninstalling and reinstalling VS and SQL — sorry, no chance. I also could not accept not installing the Management Tools, for example. I also did not have any Express version of VS or SQL installed in this box.

A little snooping around with ProcMon led me to the following registry key:

HKLM\SOFTWARE\Wow6432Node\Microsoft\DevDiv\VS\Servicing\9.0\IDE\1033

In that key I noticed the suspicious values:

"SP"=dword:00000000
"SPIndex"=dword:00000000
"SPName"="RTM"

Without quitting the SQL server installer validaton screen, I changed these values to what you see below, crossed my fingers and rerun the installer validation, which passed!

"SP"=dword:00000001
"SPIndex"=dword:00000001
"SPName"="SP1"

Now, I didn't really guess those values. I looked in a sibling registry key (...Servicing\9.0\PRO\1033) and saw that it contained those new values, then I copied them.

I think I didn't break anything. So far all seems to be working. But, as usual with anything related to manual registry hacking, you have to be really insane to change your settings because you read on a random blog on the 'net. I'm just saying... Don't come crying if your house burns down because of this.

jQuery Custom Element and Global Events

Posted by Sergio on 2010-02-21

This last week I learned a new thing about jQuery custom events, particularly the ones of global nature. There's good documentation and examples about custom element events, but not much for the global ones.

Why do we need custom events?

Custom events make it easier to keep complex pages under control. They are a pillar for loosely-coupled UI scripts. Let's start with a simple example.

Suppose we have a fairly complex and dynamic page where many elements are Ajax-editable, using in-place editors or any other approach that posts updates to the server. Depending on how quickly the server responds to the request, there's a chance the user can start another simultaneous request before the first one finishes, maybe even seeing inconsistent results, by clicking a button too soon.

In our example — a fraction of what a real complex page would be — what we want to do is disable some of these buttons while the data is being changed, and re-enable them once we hear back from the server.

Click the field to edit it:<br>

<input type="text" readonly="readonly" id="email" name="email"
   value="joe@doe.com" style="background-color: #eee;"/> 

<input type="button" class="userOperation" id="sendButton" value="Send Message">
<input type="button" class="userOperation" id="summaryButton" value="Summary">

Custom Element Events

Let's tackle this problem first with the custom element events. Below is a summary of how these custom events are used.

$('#publisher').trigger('eventName');

$('#publisher1').bind('eventName', function() {
   //eventName happened. React here.
   $('#subscriber1').doStuff();
   $('#subscriber2').doOtherStuff();
   // more...
});

In this case we will make the elements being edited announce that they entered edit mode so that any other element can act on that announcement.

$('#email').
click(function(){
	$(this).removeAttr('readonly').css({backgroundColor: ''});
	$(this).trigger('editStart');
}).
blur(function(){
	$(this).attr('readonly', 'readonly').css({backgroundColor: '#eee'});
	$.post('/updateEmail', $('#email').serialize(), function() {
		$(this).trigger('editComplete');
	});
}).
bind('editStart', function(){
	// "this" is the #email element
	console.log('edit started, this =  ' + this.id);
	$('.userOperation').attr('disabled', 'disabled');
}).
bind('editComplete', function(){
	// "this" is the #email element
	console.log('edit complete, this =  ' + this.id);
	$('.userOperation').removeAttr('disabled');		
});

$('#sendButton').click(function(){
	//code to send a message
	alert('Message sent');
});

$('#summaryButton').click(function(){
	//code to generate summary
	alert('Summary created');
});

This approach works well in the beginning but gets really ugly as more elements need to publish their own similar events or when other new elements need to do somethings with these events too. We will need to bind handlers to all these element's events and the code inside these handlers will start getting longer and probably too far from the rest of the code that relates to it.

One step forward with page level events

Since the events we are producing here really reflect the document state more than any individual field's state, let's move that event to a more top level element, namely the body element:

$('#email').
click(function(){
	$(this).removeAttr('readonly').css({backgroundColor: ''});
	$('body').trigger('editStart');
}).
blur(function(){
	$(this).attr('readonly', 'readonly').css({backgroundColor: '#eee'});
	$.post('/updateEmail', $('#email').serialize(), function() {
		$('body').trigger('editComplete');
	});
});

$('body').
bind('editStart', function(){
	// "this" is the body element
	console.log('edit started, this =  ' + this.tagName);
	$('.userOperation').attr('disabled', 'disabled');
}).
bind('editComplete', function(){
	// "this" is the body element
	console.log('edit complete, this =  ' + this.tagName);
	$('.userOperation').removeAttr('disabled');		
});

$('#sendButton').click(function(){
	//code to send a message
	alert('Message sent');
});

$('#summaryButton').click(function(){
	//code to generate summary
	alert('Summary created');
});

Now we're getting somewhere. We reduced the number of event sources to just one, so guaranteed less duplication. But it still has some shortcomings.

The code is still bound to a different element than the one we want to operate on. What I mean by that is that the event handlers are in the context of the elements publishing the event and the code in the handlers is typically geared towards the elements that need to react to that event, that is, the this keyword is less useful than in most of your common event handlers.

The pattern of these page-level events is:

$('body').trigger('eventName');

$('body').bind('eventName', function() {
   //eventName happened. React here.
   $('#subscriber1').doStuff();
   $('#subscriber2').doOtherStuff();
   // more...
});

But wait, jQuery has real global events too

I had settled down with using the above style of global events until someone at work pointed out that there's another way of doing this, which unfortunately isn't as well discussed: the custom global events.

Here's our code using global custom events:

$('#email').click(function(){
	$(this).removeAttr('readonly').css({backgroundColor: ''});
	$.event.trigger('editStart');
}).blur(function(){
	$(this).attr('readonly', 'readonly').css({backgroundColor: '#eee'});
	$.post('/updateEmail', $('#email').serialize(), function() {
		$.event.trigger('editComplete');
	});
});

$('.userOperation').bind('editStart', function(){
	// "this" is a .userOperation button
	console.log('edit started, button: ' + this.id);
	$('.userOperation').attr('disabled', 'disabled');
}).bind('editComplete', function(){
	// "this" is a .userOperation button
	console.log('edit complete, button: ' + this.id);
	$('.userOperation').removeAttr('disabled');		
});

$('#sendButton').click(function(){
	//code to send a message
	alert('Message sent');
});

$('#summaryButton').click(function(){
	//code to generate summary
	alert('Summary created');
});

What is great about this type of event is that they are in the context of the subscribing elements, as if these elements were the publishers of the event, much like the majority of the event handling code we write.

They also allow us to move more code next to the other event handler for the subscribing elements, and even chain them all together. As an example, let's modify the event handlers of the #sendButton element to add some different behavior when the editStart event happens.

$('#sendButton').click(function(){
	//code to send a message
	alert('Message sent');
}).bind('editStart', function(){
	// "this" is the #sendButton button
	this.value = 'Send message (please refresh)';
	// change the click event handler.
	$(this).unbind('click').click(function(){
		alert('Sorry, refresh page before sending message');
	});
});

And here is the simplified representation of the global events code.

$.event.trigger('eventName');

$('#subscriber1').bind('eventName', function() {
   //eventName happened. React here.
   $(this).doStuff();
});

$('#subscriber2').bind('eventName', function() {
   //eventName happened. React here.
   $(this).doOtherStuff();
});
//more...

Conclusion

Event-based programming is the usual way we write UI code. By understanding the different types of events that jQuery provides we can allow our UI to grow without getting into a messy nightmare of event handling code scattered all over the place.
Code coverage reports with NCover and MSBuild

Posted by Sergio on 2010-02-09

I've been doing a lot of static analysis on our projects at work lately. As part of that task we added NCover to our automated build process. Our build runs on Team Build (TFS) and is specified in an MSBuild file.

We wanted to take code metrics very seriously and we purchased the complete version of the product to take full advantage of its capabilities.

Getting NCover to run in your build is very simple and the online documentation will be enough to figure it out. The problem comes when you begin needing to create more and more variations of the reports. The online documentation is a little short on this aspect, especially on how to use the MSBuild or NAnt custom tasks. I hear they plan to update the site with better docs for the next version of the product.

NCover Complete comes with 23 different types of reports and a ton of parameters that can be configured to produce far more helpful reports than just sticking to the defaults.

For example, we are working on a new release of our product and we are pushing ourselves to produce more testable code and write more unit tests for all the new code. The problem is that the new code is a just tiny fraction of the existing code and the metrics get averaged down by the older code.

The key is to separate the code coverage profiling (which is done by NCover while it runs all the unit tests with NUnit) from the rendering of the reports. That way we only run the code coverage once; and that can sometimes take a good chunk of time to produce the coverage data. Rendering the reports is much quicker since the NCover reporting engine can feed off the coverage data as many times as we need, very quickly.

Once we have the coverage data we can choose which report types we want to create, the thresholds for sufficient coverage (or to fail the build), which assemblies/types/methods we want to include/exclude from each report and where to save each of them.

Example

To demonstrate what I just described in practice, I decided to take an existing open source project and add NCover reporting to it. The project I selected was AutoMapper mostly because it's not very big and has decent test coverage.

I downloaded the project's source code from the repository and added a file named AutoMapper.msbuild to its root directory. You can download this entire file but I'll go over it piece by piece.

We start by just importing the MSBuild tasks that ship with NCover into our script and declaring a few targets, including one to collect coverage data and one to generate the reports. I added the NCover tasks dll to the project directory tools/NCoverComplete.

<Project DefaultTargets="RebuildReports" 
  xmlns="http://schemas.microsoft.com/developer/msbuild/2003" >
  <UsingTask  TaskName="NCover.MSBuildTasks.NCover" 
        AssemblyFile="$(ProjectDir)tools\NCoverComplete\NCover.MSBuildTasks.dll"/>
  <UsingTask  TaskName="NCover.MSBuildTasks.NCoverReporting" 
        AssemblyFile="$(ProjectDir)tools\NCoverComplete\NCover.MSBuildTasks.dll"/>

  <PropertyGroup>
    <Configuration Condition=" '$(Configuration)' == '' ">Debug</Configuration>
    <BuildDir>$(MSBuildProjectDirectory)\build\$(Configuration)</BuildDir>
    <NUnitBinDirectoryPath>$(MSBuildProjectDirectory)\tools\NUnit</NUnitBinDirectoryPath>
  </PropertyGroup>

  <Target Name="RebuildReports" DependsOnTargets="RunCoverage;ExportReports" >
    <Message Text="We will rebuild the coverage data than refresh the reports." 
          Importance="High" />
  </Target>

  <Target Name="RunCoverage" >
    <!-- snip -->
  </Target>

  <Target Name="ExportReports" >
    <!-- snip -->
  </Target>
</Project>

Now let's look closely at the target that gathers the coverage data. All it does is tell NCover (NCover console, really) to run NUnit over the AutoMapper.UnitTests.dll and save all the output to well-known locations.

<Target Name="RunCoverage" >
  <Message Text="Starting Code Coverage Analysis (NCover) ..." Importance="High" />
  <PropertyGroup>
    <NCoverOutDir>$(MSBuildProjectDirectory)\build\NCoverOut</NCoverOutDir>
    <NUnitResultsFile>build\NCoverOut\automapper-nunit-result.xml</NUnitResultsFile>
    <NUnitOutFile>build\NCoverOut\automapper-nunit-Out.txt</NUnitOutFile>
    <InputFile>$(BuildDir)\UnitTests\AutoMapper.UnitTests.dll</InputFile>
  </PropertyGroup>

  <NCover ToolPath="$(ProgramFiles)\NCover"
    ProjectName="$(Scenario)"
    WorkingDirectory="$(MSBuildProjectDirectory)"   
    TestRunnerExe="$(NUnitBinDirectoryPath)\nunit-console.exe"

    TestRunnerArgs="$(InputFile) /xml=$(NUnitResultsFile) /out=$(NUnitOutFile)"

    AppendTrendTo="$(NCoverOutDir)\automapper-coverage.trend"
    CoverageFile="$(NCoverOutDir)\automapper-coverage.xml"
    LogFile="$(NCoverOutDir)\automapper-coverage.log"
    IncludeTypes="AutoMapper\..*"
    ExcludeTypes="AutoMapper\.UnitTests\..*;AutoMapper\.Tests\..*"
    SymbolSearchLocations="Registry, SymbolServer, BuildPath, ExecutingDir"
  />
</Target>

Of special interest in the NCover task above are the output files named automapper)-coverage.xml and automapper-coverage.trend, which contain the precious coverage data and historical trending respectively. In case you're curious, the trend file is actually a SQLite3 database file that you can report directly from or export to other database formats if you want.

Also note the IncludeTypes and ExcludeTypes parameters, which guarantee that we are not tracking coverage on code that we don't care about.

Now that we have our coverage and trend data collected and saved to files we know, we can run as many reports as we want without needing to execute the whole set of tests again. That's in the next target.

<Target Name="ExportReports" >
  <Message Text="Starting Producing NCover Reports..." Importance="High" />
  <PropertyGroup>
    <Scenario>AutoMapper-Full</Scenario>
    <NCoverOutDir>$(MSBuildProjectDirectory)\build\NCoverOut</NCoverOutDir>
    <RptOutFolder>$(NCoverOutDir)\$(Scenario)Coverage</RptOutFolder>
    <Reports>
      <Report>
        <ReportType>FullCoverageReport</ReportType>
        <OutputPath>$(RptOutFolder)\Full\index.html</OutputPath>
        <Format>Html</Format>
      </Report>
      <Report>
        <ReportType>SymbolModuleNamespaceClass</ReportType>
        <OutputPath>$(RptOutFolder)\ClassCoverage\index.html</OutputPath>
        <Format>Html</Format>
      </Report>
      <Report>
        <ReportType>Trends</ReportType>
        <OutputPath>$(RptOutFolder)\Trends\index.html</OutputPath>
        <Format>Html</Format>
      </Report>
    </Reports>
    <SatisfactoryCoverage>
      <Threshold>
        <CoverageMetric>MethodCoverage</CoverageMetric>
        <Type>View</Type>
        <Value>80.0</Value>
      </Threshold>
      <Threshold>
        <CoverageMetric>SymbolCoverage</CoverageMetric>
        <Value>80.0</Value>
      </Threshold>
      <Threshold>
        <CoverageMetric>BranchCoverage</CoverageMetric>
        <Value>80.0</Value>
      </Threshold>
      <Threshold>
        <CoverageMetric>CyclomaticComplexity</CoverageMetric>
        <Value>8</Value>
      </Threshold>
    </SatisfactoryCoverage>

  </PropertyGroup>

  <NCoverReporting 
    ToolPath="$(ProgramFiles)\NCover"
    CoverageDataPaths="$(NCoverOutDir)\automapper-coverage.xml"
    LoadTrendPath="$(NCoverOutDir)\automapper-coverage.trend"
    ProjectName="$(Scenario) Code"
    OutputReport="$(Reports)"
    SatisfactoryCoverage="$(SatisfactoryCoverage)"
  />
</Target>

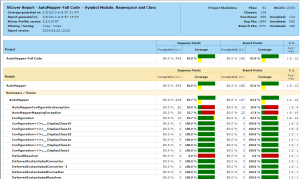
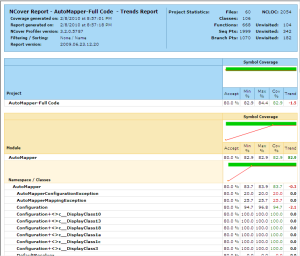
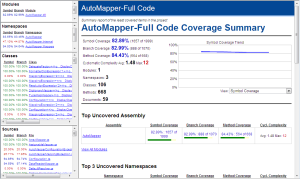
What you can see in this target is that we are creating three different reports, represented by the Report elements and that we are changing the satisfactory threshold to 80% code coverage (down from the default of 95%) and the maximum cyclomatic complexity to 8. These two blocks of configuration are passer to the NCoverReporting task via the parameters OutputReport and SatisfactoryCoverage, respectively.

The above reports are shown in the images below.


Focus on specific areas

Let's now say that, in addition to the reports for the entire source code, we also want to keep a closer eye on the classes under the AutoMapper.Mappers namespace. We can get that going with another reporting target, filtering the reported data down to just the code we are interested in:

<Target Name="ExportReportsMappers" >
  <Message Text="Reports just for the Mappers" Importance="High" />
  <PropertyGroup>
    <Scenario>AutoMapper-OnlyMappers</Scenario>
    <NCoverOutDir>$(MSBuildProjectDirectory)\build\NCoverOut</NCoverOutDir>
    <RptOutFolder>$(NCoverOutDir)\$(Scenario)Coverage</RptOutFolder>
    <Reports>
      <Report>
        <ReportType>SymbolModuleNamespaceClass</ReportType>
        <OutputPath>$(RptOutFolder)\ClassCoverage\index.html</OutputPath>
        <Format>Html</Format>
      </Report>
      <!-- add more Report elements as desired -->
    </Reports>
    <CoverageFilters>
      <Filter>
        <Pattern>AutoMapper\.Mappers\..*</Pattern>
        <Type>Class</Type>
        <IsRegex>True</IsRegex>
        <IsInclude>True</IsInclude>
      </Filter>
      <!-- include/exclude more classes, assemblies, namespaces, 
      methods, files as desired -->
    </CoverageFilters>

  </PropertyGroup>

  <NCoverReporting 
    ToolPath="$(ProgramFiles)\NCover"
    CoverageDataPaths="$(NCoverOutDir)\automapper-coverage.xml"
    ClearCoverageFilters="true"
    CoverageFilters="$(CoverageFilters)"
    LoadTrendPath="$(NCoverOutDir)\automapper-coverage.trend"
    ProjectName="$(Scenario) Code"
    OutputReport="$(Reports)"
  />
</Target/>

Now that we have this basic template our plan is to identify problem areas in the code and create reports aimed at them. The URLs of the reports will be included in the CI build reports and notification emails.

It's so easy to add more reports that we will have reports that will live for a single release cycle or even less if we need it.

I hope this was helpful for more people because it did take a good amount of time to get it all sorted out. Even if you're using NAnt instead of MSBuild, the syntax is similar and I'm sure you can port the idea easily.

How to detect the text encoding of a file

Posted by Sergio on 2010-01-26

Today I needed a way to identify ANSI (Windows-1252) and UTF-8 files in a directory filled with files of these two types. I was surprised to not find a simple way of doing this via a property of method somewhere under the System.IO namespace.

Not that it's that hard to identify the encoding programmatically, but it's always better when you don't need to write a method yourself. Anyway, here's what I came up with. It detects UTF-8 encoding based on the encoding signature added to the beginning of the file.

The code below is specific to UTF-8 but shouldn't be too hard to extend the example to detect more encodings.

public static bool IsUtf8(string fname){
  using(var f = File.Open(fname, FileMode.Open)){
    var sig = new byte[Encoding.UTF8.GetPreamble().Length];
    f.Read(sig, 0, sig.Length);
    return sig.SequenceEqual(Encoding.UTF8.GetPreamble());
  }
}

Maybe I just looked in the wrong places. Does anyone know a simpler way in the framework to accomplish this?

On ALT.NET and patience

Posted by Sergio on 2010-01-19

There ALT.NET bashing season is on full steam. Ian Cooper has a thorough post about it.

To my recollection, ALT.NET was formed by people that shared very similar tastes on what represents good development tools, practices, and methodologies. This group of people, just by the simple fact that they decided to get together under one roof to discuss these ideas, showed that they are constantly and decidedly trying to become better at what they do.

But when you take the step to form a new community or movement (or whatever else you want to call it) you can't easily control who jumps on board or who jumps ship - and you shouldn't even try to.

Inevitably the original idea started to attract many different kinds of participants, which I'm going to roughly distribute in the below four categories (I was tempted to use the term personas, but … never mind.)

  1. I'm here to help
    • I like to teach,
    • to write,
    • to contribute to OSS,
    • coordinating UGs and events
  2. Those who like to complain
    A very minor percentage of those know how to externalize their criticism in a constructive way. Unfortunately the majority limit their contributions to rants and trolling.
    That's probably the only group of people that I'd try to weed out if I could (but I can't; and we shouldn't).
  3. Those who want to learn
    • They want to hear about other ideas,
    • to figure out how to bring better practices to their work,
    • they have a specific problem and they're seeking opinions or answers.
  4. Heliotropic migrants
    The ones who want to be linked to (and hops on) every new, shiny thing for commercial reasons. There's always this type of people. They need to latch on to what could be the next big thing for the sake of their own livelihood. There's nothing wrong with that, by the way.

Some people just can't put up with the other types. Some folks go ballistic with people on #4, others can't stand the whiners in #2. Some don't tolerate repeated or trivial questions from folks that are just trying to learn.

In the midst of all this, it becomes hard to connect #1 and #3, which I think is the ultimate reason for ALT.NET existence.

Frankly speaking, I think I've personally danced around in all these four categories but I find myself most of the time in #3 and some other times in #1. I do apologize for my ventures in #2 – it's hard to avoid.

So, if you dabble in the ALT.NET waters, let me just ask you to exercise a little bit of patience. We all still have a lot to learn and there's very good indications that some of those lessons are permeating the .NET development community — from the individual developer to the big Enterprise, Inc.

Let's no try to change the world with a single swing of the bat. Changing one constructor method at a time will get us further. In the end, the idea is simply to more efficiently produce more maintainable and reliable software.