Android App From Idea to Market In a Few Hours
I had been playing a little bit with Android development but not really worried about creating any useful or commercially viable application yet. I believe I'll end up creating a handful of small apps, some for personal use and some for fun. It will not hurt if a fraction of those yield some profit, but that isn't a realistic goal for now.
Maybe I'm wrong, but judging from what I've done professionally up to this date, I think any money that I eventually make with mobile apps will come from custom built LOB apps.
Nevertheless, the app I'm going to walk us through in this post is a free and for-fun project. You can find the complete source code at the bottom.
The Idea
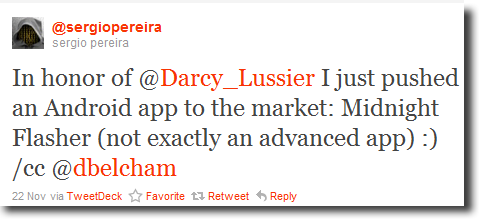
Just the other day on Twitter I was poking fun at D'Arcy Lussier, then Don Belcham came up with a funny comment that triggered this colossal waste of code.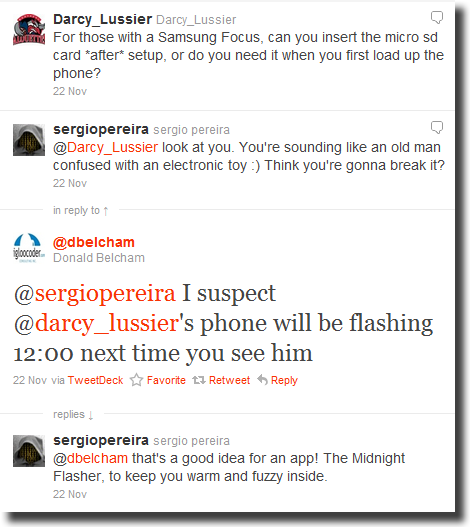
The Lessons
Since this app is really a glorified Hello World and I had never let any other Android app leave the confines of my emulator, that's the perspective I'm hoping to share.
I'll try to show what's involved from when your first app is ready to fly to when it's finally available for download in the Android Market.
The Prerequisites
There are tons of compentent introductory articles to Android development, and I'll do everybody a favor and not rehash all that here. Suffice to say you can assume I went through some of those articles and have my development machine ready to go, with:
- JDK (not just the JRE)
- Android SDK
- Eclipse IDE
- Android Development Tools for Eclipse (ADT)
- At least one virtual device (AVD) created (the emulator)
As you probably know, you don't need to use Eclipse but I think it makes your life easier if you're a total Java n00b like myself; most of the Android tutorials and Q&A out there refer to Eclipse.
The Code
In case I haven't said it enough, this is a very simple application, so I chose to target the lowest SDK version that I could, which in my case is the absolute lowest one available: SDK version 3 for Android 1.5 (Cupcake.)
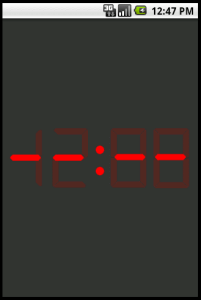
To create the blinking 12:00 text I figured the easiest way would be to use two separate image files and alternate between them using a very basic animation. The animation is preferred over (animated) GIFs.
Images are embedded in your application as resources, under your project's
res/drawable directory.
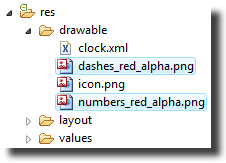
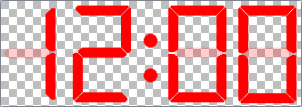
I used a pair of PNG images with transparent backgrounds. One of them is seen below.
Animations are defined in another type of resource. They are XML files with
the animation specification. They support a nice range of tweening parameters but
we'll only need a straight forward frame-by-frame animation. Here's the clock.xml
file that I created inside that same drawable directory. Note the
two image files drawable resource names that are the file names minus the extension.
<?xml version="1.0" encoding="utf-8"?>
<animation-list xmlns:android="http://schemas.android.com/apk/res/android"
  android:oneshot="false">
  <item
    android:drawable="@drawable/dashes_red_alpha"
    android:duration="500" />
  <item
    android:drawable="@drawable/numbers_red_alpha"
    android:duration="500" />
</animation-list>
Now we need to make that animation show up in the
center of the screen. The application has only one
activity (activities are the Android term for screens, windows, dialogs, etc.)
That appearance of that screen is defined by the layout file main.xml, in the
project's res/layout directory. If you're familiar with other
XML based GUI layout formats like XAML or XUL (and even XHTML and ASP.NET
webforms to some extend,) Android layout syntax is fairly reasonable. The
sad part is that there isn't a good editor for them (there are some
attempts out there but nothing worth praising yet.)
Anyway, here's the layout I used in main.xml. The animation
will be displayed by that ImageView view (views are the individual
elements or controls like textboxes and buttons, etc.) You can see
that the image is centered in the layout (the layout_centerInParent
attribute.)
<?xml version="1.0" encoding="utf-8"?>
<RelativeLayout
    ...
  >
  <ImageView android:id="@+id/digits"
    ...
    android:layout_centerInParent="true"
    android:background="@drawable/clock"
    />
</RelativeLayout>
All that's left now is telling our activity to use the above layout and start the animation when the app gains focus (we need to wait until the app gets focus otherwise it might be too early to start and it will not do anything). The main activity class in this project is called Home, seen below
public class Home extends Activity {
  /* snip */

  @Override
  public void onWindowFocusChanged(boolean hasFocus) {
    AnimationDrawable frameAnimation =
	  (AnimationDrawable) findViewById(R.id.digits).getBackground();

    if (hasFocus) {
      frameAnimation.start();
    } else {
      frameAnimation.stop();
    }
  }
}
And that's all there's to this application. We can start it in the AVD emulator and see it in all its blinktastic glory.
Package it up
Having an app running on the emulator or in your own phone is nice but it doesn't make the world a better place. We must push this application to the Android Market so everyone can have it.
At this point I should be telling you how a responsible developer would test his app in different AVDs, maybe different real devices, screen orientations, etc. But guess what? No siree, Bob. <sarcasm>In true Android developer fashion,</sarcasm> we're going straight to the Market and there's no stopping us.
Build it
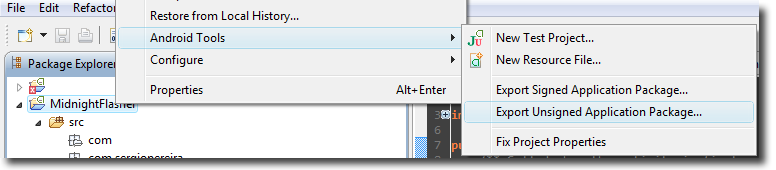
The first step in packaging the app is to simply build the release binaries. Yo can do that in Eclipse by right-clicking the project in the Package Explorer and choosing Android Tools -> Export Unsigned Application Package and choose a directory to save it. You application .apk file will be created there.
Sign it
We can't simply send that file as-is to the market. To be accepted in the market, our application needs to be stamped with something that tells everyone who built it. This is akin to the strong naming keys that are used in .NET.
To stamp, or sign, our app we first need to create our own private key and certificate, which will live in a keystore file. If you already have one such file, you can obviously use the existing one instead. We can use the keytool.exe utility to do create it. In my box I have keytool in the JDK installation directory, so I'll run this command (one line):
C:\[JDKHOME]\bin\keytool.exe -genkey -v
  -keystore your_secret_file.keystore -alias YourAliasHere -keyalg RSA
  -keysize 2048 -validity 10000
When you run it, it'll ask you for a few identification parameters for the certificate and also a password that you'll need to remember later. Just like the SN key files in .NET, make sure you keep the produced keystore file in a safe place.
Time to use another tool to sign our .apk file with the information in the keystore file. Use this command.
C:\[JDKHOME]\bin\jarsigner.exe -keystore
  your_secret_file.keystore YourApp.apk YourAliasHere
The above command will prompt you for the password again.
Optimize it
The last step in the .apk preparation is an optimization process to realign bytes in the file for faster reads on the device. You'd be surprised to know that there's another tool to do that. Not surprised? I thought so. Here's the command. You'll find the utility in your Android SDK installation directory. It will write the optimized version to another .apk file, which I'm choosing to name with the version number 1.0.
C:\[ANDROID_SDK_HOME]\tools\zipalign.exe -v 4 YourApp.apk YourApp_1_0.apk
Now to the market we go.
Publishing an app
The Android Market is where the vast majority of Android users go to find apps for their devices. You definitely want to have your application listed in there.
In order to upload an app to the market, you'll need to purchase a developer account, which at the time of this writing will cost you USD 25.00.
We're almost done here, I promise. Next we only need to logon to the market with our newly minted account and upload the application. The upload form will ask you for a couple of screenshots, a 512x512 high-res icon (?) and a bunch of other unsurprising fields.
Hit Publish and pat yourself on the back. You're officially an Android developer. I hope your first app isn't as lame as mine and that I could have helped you go through the process quicker than I.
Money flows in. Oh, wait
Okay, I can't promise an early retirement to anyone. That's on you to create the next viral app. But I can leave you with some good examples of successful apps.
- Paper Toss dev makes $500k per month
- Angry Birds for Android expected to generate $1 million per month
- An Android Success Story: $13,000/month App Sales
Source code
Although there isn't really much to it, you can also download the source code of this app.