Sergio and the sigil

Android App From Idea to Market In a Few Hours

Posted by Sergio on 2010-12-06

I had been playing a little bit with Android development but not really worried about creating any useful or commercially viable application yet. I believe I'll end up creating a handful of small apps, some for personal use and some for fun. It will not hurt if a fraction of those yield some profit, but that isn't a realistic goal for now.

Maybe I'm wrong, but judging from what I've done professionally up to this date, I think any money that I eventually make with mobile apps will come from custom built LOB apps.

Nevertheless, the app I'm going to walk us through in this post is a free and for-fun project. You can find the complete source code at the bottom.

The Idea

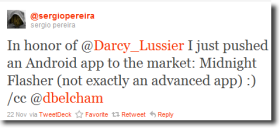
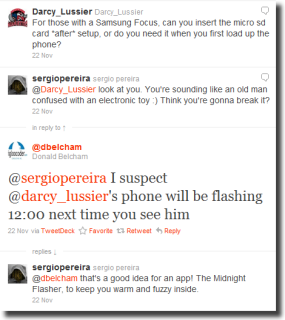
Just the other day on Twitter I was poking fun at D'Arcy Lussier, then Don Belcham came up with a funny comment that triggered this colossal waste of code.

Fast forward to later that day, the app was ready for download.

The Lessons

Since this app is really a glorified Hello World and I had never let any other Android app leave the confines of my emulator, that's the perspective I'm hoping to share.

I'll try to show what's involved from when your first app is ready to fly to when it's finally available for download in the Android Market.

The Prerequisites

There are tons of compentent introductory articles to Android development, and I'll do everybody a favor and not rehash all that here. Suffice to say you can assume I went through some of those articles and have my development machine ready to go, with:

  • JDK (not just the JRE)
  • Android SDK
  • Eclipse IDE
  • Android Development Tools for Eclipse (ADT)
  • At least one virtual device (AVD) created (the emulator)

As you probably know, you don't need to use Eclipse but I think it makes your life easier if you're a total Java n00b like myself; most of the Android tutorials and Q&A out there refer to Eclipse.

The Code

In case I haven't said it enough, this is a very simple application, so I chose to target the lowest SDK version that I could, which in my case is the absolute lowest one available: SDK version 3 for Android 1.5 (Cupcake.)

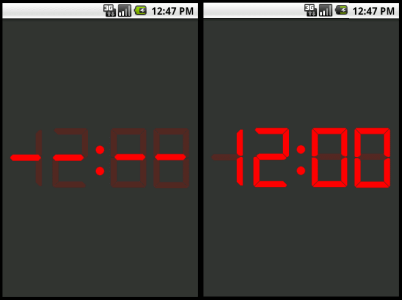
To create the blinking 12:00 text I figured the easiest way would be to use two separate image files and alternate between them using a very basic animation. The animation is preferred over (animated) GIFs.

Images are embedded in your application as resources, under your project's res/drawable directory.
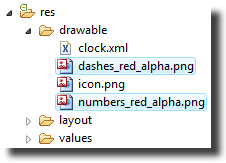
I used a pair of PNG images with transparent backgrounds. One of them is seen below.
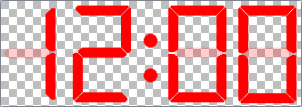
Animations are defined in another type of resource. They are XML files with the animation specification. They support a nice range of tweening parameters but we'll only need a straight forward frame-by-frame animation. Here's the clock.xml file that I created inside that same drawable directory. Note the two image files drawable resource names that are the file names minus the extension.

<?xml version="1.0" encoding="utf-8"?>
<animation-list xmlns:android="http://schemas.android.com/apk/res/android"
  android:oneshot="false">
  <item 
    android:drawable="@drawable/dashes_red_alpha" 
    android:duration="500" />
  <item 
    android:drawable="@drawable/numbers_red_alpha" 
    android:duration="500" />
</animation-list>

Now we need to make that animation show up in the center of the screen. The application has only one activity (activities are the Android term for screens, windows, dialogs, etc.) That appearance of that screen is defined by the layout file main.xml, in the project's res/layout directory. If you're familiar with other XML based GUI layout formats like XAML or XUL (and even XHTML and ASP.NET webforms to some extend,) Android layout syntax is fairly reasonable. The sad part is that there isn't a good editor for them (there are some attempts out there but nothing worth praising yet.)

Anyway, here's the layout I used in main.xml. The animation will be displayed by that ImageView view (views are the individual elements or controls like textboxes and buttons, etc.) You can see that the image is centered in the layout (the layout_centerInParent attribute.)

<?xml version="1.0" encoding="utf-8"?>
<RelativeLayout 
    ...
  >  
  <ImageView android:id="@+id/digits"
    ...
    android:layout_centerInParent="true"
    android:background="@drawable/clock"
    />  
</RelativeLayout>

All that's left now is telling our activity to use the above layout and start the animation when the app gains focus (we need to wait until the app gets focus otherwise it might be too early to start and it will not do anything). The main activity class in this project is called Home, seen below

public class Home extends Activity {
  /* snip */

  @Override
  public void onWindowFocusChanged(boolean hasFocus) {
    AnimationDrawable frameAnimation = 
	  (AnimationDrawable) findViewById(R.id.digits).getBackground();

    if (hasFocus) {
      frameAnimation.start();
    } else {
      frameAnimation.stop();
    }
  }
}

And that's all there's to this application. We can start it in the AVD emulator and see it in all its blinktastic glory.
Package it up

Having an app running on the emulator or in your own phone is nice but it doesn't make the world a better place. We must push this application to the Android Market so everyone can have it.

At this point I should be telling you how a responsible developer would test his app in different AVDs, maybe different real devices, screen orientations, etc. But guess what? No siree, Bob. <sarcasm>In true Android developer fashion,</sarcasm> we're going straight to the Market and there's no stopping us.

Build it

The first step in packaging the app is to simply build the release binaries. Yo can do that in Eclipse by right-clicking the project in the Package Explorer and choosing Android Tools -> Export Unsigned Application Package and choose a directory to save it. You application .apk file will be created there.

Sign it

We can't simply send that file as-is to the market. To be accepted in the market, our application needs to be stamped with something that tells everyone who built it. This is akin to the strong naming keys that are used in .NET.

To stamp, or sign, our app we first need to create our own private key and certificate, which will live in a keystore file. If you already have one such file, you can obviously use the existing one instead. We can use the keytool.exe utility to do create it. In my box I have keytool in the JDK installation directory, so I'll run this command (one line):

C:\[JDKHOME]\bin\keytool.exe -genkey -v 
  -keystore your_secret_file.keystore -alias YourAliasHere -keyalg RSA 
  -keysize 2048 -validity 10000

When you run it, it'll ask you for a few identification parameters for the certificate and also a password that you'll need to remember later. Just like the SN key files in .NET, make sure you keep the produced keystore file in a safe place.

Time to use another tool to sign our .apk file with the information in the keystore file. Use this command.

C:\[JDKHOME]\bin\jarsigner.exe -keystore 
  your_secret_file.keystore YourApp.apk YourAliasHere

The above command will prompt you for the password again.

Optimize it

The last step in the .apk preparation is an optimization process to realign bytes in the file for faster reads on the device. You'd be surprised to know that there's another tool to do that. Not surprised? I thought so. Here's the command. You'll find the utility in your Android SDK installation directory. It will write the optimized version to another .apk file, which I'm choosing to name with the version number 1.0.

C:\[ANDROID_SDK_HOME]\tools\zipalign.exe -v 4 YourApp.apk YourApp_1_0.apk

Now to the market we go.

Publishing an app

The Android Market is where the vast majority of Android users go to find apps for their devices. You definitely want to have your application listed in there.

In order to upload an app to the market, you'll need to purchase a developer account, which at the time of this writing will cost you USD 25.00.

We're almost done here, I promise. Next we only need to logon to the market with our newly minted account and upload the application. The upload form will ask you for a couple of screenshots, a 512x512 high-res icon (?) and a bunch of other unsurprising fields.

Hit Publish and pat yourself on the back. You're officially an Android developer. I hope your first app isn't as lame as mine and that I could have helped you go through the process quicker than I.

Money flows in. Oh, wait

Okay, I can't promise an early retirement to anyone. That's on you to create the next viral app. But I can leave you with some good examples of successful apps.

Source code

Although there isn't really much to it, you can also download the source code of this app.
Have you met arguments.callee?

Posted by Sergio on 2010-09-10

Just the other day I had a need to use arguments.callee and I realized that's not something you really see every day in JavaScript. Maybe I could talk about it a bit.

Anonymous functions everywhere

It's not news to anyone reading this blog that one of JavaScript's workhorses are anonymous functions. Callbacks, strategies, deferred execution, event handlers, etc. They just seem to be all over the place — and for a good reason; they can be convenient and reduce the pollution of a bunch functions that are only called from a single spot.

Another nice thing is that, once your eyes are trained to ignore the little bit of noise that they add to the code, the code is really readable and, dare I say it, expressive.

Yet another contrived example

Let's say we are really into reinventing the wheel and with our understanding of anonymous functions we create a revolutionary map function:

function map(array, compute){
  var result = [ ];
  for(var i=0; i < array.length; i++){
    result.push( compute(array[i]) );
  }
  return result;
}

This function, as you can hopefully see, transforms each element of the given array into something else and returns the array of the transformed elements. Two simple uses are shown below.

//apply discount
var prices = [1, 2, 3, 4];
var discount = 0.1; // 10% off today, w00t!
var newPrices = map(prices, function(price){ return (1-discount)*price; } );
//==> [0.9, 1.8, 2.7, 3.6]

//compute areas
var squareSides = [1, 2, 3, 4];
var squareAreas = map(squareSides, function(side){ return side*side; } );
//==> [1, 4, 9, 16]

I warned you the examples would be contrived, didn't I?

Now your product manager comes and asks for a page where the users can enter a list of numbers and get the factorials for each of them. You immediately think your friend the map function will save the day. You start and...

//return the factorials
var userNumbers = [1, 2, 3, 4];
var factorials = map(userNumbers, function(number){ 
  if(number <= 1) { return 1; }
  return number * ????????(number - 1); // ooops! I need to recurse here.
} );

You see, there's this thing with anonymous functions. They don't have a name, d'oh. As I said in the beginning, we typically use them in situations where they are called only once so we can inline them and forego the need fora name. But now we're kind of wishing they had a name.

Anonymity won't hide you from me

Well, if the post tittle didn't already give it away, we can achieve that with arguments.callee. Using arguments.callee inside a function gives us a reference to the function itself. So now we can finish our code.

//return the factorials
var userNumbers = [1, 2, 3, 4];
var factorials = map(userNumbers, function(number){ 
  if(number <= 1) { return 1; }
  return number * arguments.callee(number - 1);
  //or if you were using "this" in the function you'll probably want to:
  // return number * arguments.callee.apply(this, [number - 1]);
} );
//==> [1, 2, 6, 24]

A more real world scenario

I won't leave you without at least a reference to a real use case for this feature. The example I'll show comes from Nicholas Zakas. In a blog post a while ago he showed how we can break up long running tasks with smaller timed/deferred chunks, improving the browser's responsiveness.

Here's the function from his blog post, which process chunks of an array for 50ms, then stops and call itself back to process the remaining items soon after that — giving the browser a chance to breathe and take care of its interaction with the user

//Copyright 2009 Nicholas C. Zakas. All rights reserved.
//MIT Licensed
function timedChunk(items, process, context, callback){
   var todo = items.concat();   //create a clone of the original

  setTimeout(function(){

    var start = +new Date();

    do {
       process.call(context, todo.shift());
    } while (todo.length > 0 && (+new Date() - start < 50));

    if (todo.length > 0){
      setTimeout(arguments.callee, 25);
    } else {
      callback(items);
    }
  }, 25);
}

I hope this shows you a little new trick.

Chrome Extension Development

Posted by Sergio on 2010-06-28

Do you like JavaScript? Have you been looking for a reaon or an idea to learn and start using HTML5? Google Chrome extesions are a great way to get into HTML5 and all its new APIs with bite sized applications.

Anatomy of a Chrome Extension

A Chrome extesion is nothing more than a tiny website that runs hosted inside Chrome. Like any website, it consists of regular web components. Grossly simplifying it is just a directory full of files, such as JavaScript, CSS, images, HTML5, and anything else you usually add to a web page.

Because it runs inside the browser, you have access to things like browser events, browsing history, and open tabs.

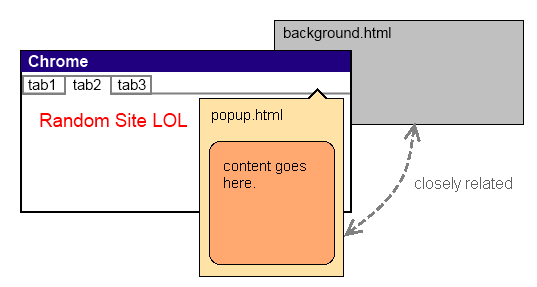
Essentially, your extension gets loaded as an HTML page called background.html where you can put any common/global functions and variables. This page is never visible and even if you don't provide a background.html in your extension, Chrome will load an empty one for you. All other pages in your extension can access the background page's functions.

Here's a diagram of a common scenario.

Today's Brew

Our sample extension will be something simple but that at the same time will let us explore interesting aspects of extensions development, namely local storage and cross-domain requests.

The sample is also a hat tip to the valuable work Chris Alcock does with his The Morning Brew, collecting some of the best links for all of us.

What we will do here is create an extension that will show us his latests links at the click of a button.

Introduce yourself

The extension needs to inform Chrome a few details about itself, such as name, default icons, along with any permissions it requests to access privileged browser features. This is done through the manifest file, which is just a JSON document. Here's our manifest file, aptly named manifest.json.

{
  "name": "Today's Brew",
  "version": "1.0",
  "description": "Latest links from The Morning Brew.",
  "icons": { 
    "48": "icon48.png",
    "128": "icon128.png" 
  },
  "browser_action": {
    "default_icon": "icon.png",
    "default_popup": "popup.html"
  },
  "permissions": [
    "http://feeds.feedburner.com/",
    "tabs"
  ]
}

What you can do

Extensions can perform several different jobs, like showing notifications, providing new themes, changing some of the default Chrome pages, etc. One other thing they can do are the browser actions, which basically means adding a button to the toolbar that acts independent of what page is being shown, as if it were just another browser feature.

If you look at our manifest file you'll notice we declared a browser_action, with its icon and the page it opens wen clicked.

Our extension does not have a custom background page, we will just rely on the default one Chrome will give us and put all of our logic in the popup page that we will open.

What you need to do that

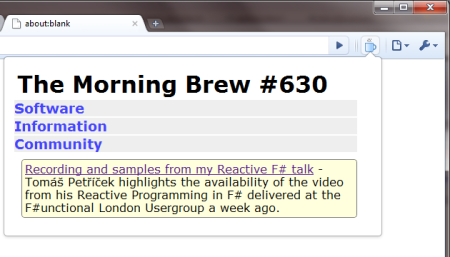
Here's how our extension will look like when we're done.

In our extension, other than manipulating our own extension's HTML dynamically (which doesn't require any special permissions) we will need to fetch the RSS feed from Feedburner and eventually open new tabs as the user clicks on the links.

That's what you can see in the permissions section of the manifest file above.

Getting down to business

To create our extension we start by creating an empty directory and adding our manifest.json file and all the icon image files that we mentioned in that manifest file.

Then we create our popup.html file, which will be pretty empty and will be populated with the content we will retrieve from the RSS feed. Here's that file.

<script type="text/javascript" src="jquery.js"></script>
<script type="text/javascript" src="popup.js"></script>
<div id="main">
  <h1></h1>
  <div id="content">
  </div>
</div>

As you can see, we will be using jQuery so we should also add that file to our directory. We will leave all the beautification of the popup in the popup.css file, which I won't bother showing here; you can download it along with the rest of the code at the end of this article.

The other file referenced by the HTML is popup.js. That's where all the action happens.

$(document).ready(function(){
  SERGIOPEREIRA.samples.todaysBrew.init();
});

var SERGIOPEREIRA = {
  samples: {
    todaysBrew: {
      state: { },
      feedUrl: 'http://feeds.feedburner.com/ReflectivePerspective?format=xml',
      todaysUrl: '',
      maxAgeHours: 12, // keep it for 12 hours
      
      init: function(){
        $('#content h3').live('click', function(){
          $('#content ul:visible').slideUp();
          $(this).next().slideToggle();
        });

        $('#content li a').live('click', function(){
          $('#content ul:visible').slideUp();
          chrome.tabs.create({url: this.href});
        });

        $('h1').click(function(){
          chrome.tabs.create({url: SERGIOPEREIRA.samples.todaysBrew.todaysUrl});
        });
        
        if(typeof chrome != 'undefined') {
          this.state = localStorage.getItem('latestBrew');

          if(this.state){
            var now = new Date();
            var minTimestamp = new Date();
            minTimestamp.setHours(minTimestamp.getHours() - this.maxAgeHours);
            minTimestamp = minTimestamp.toJSON();

            if(this.state.timestamp > minTimestamp) {
              this.renderLatest(this.state.latestData);
              return;
            }
          }
          this.refresh();
        }
      },
      refresh: function(){
        console.log('will get feed data...');
        $.get(this.feedUrl, function(xml, status, xhr){
          SERGIOPEREIRA.samples.todaysBrew.update(xml);
        });
      },
      update: function(feedXml) {
        var latest = this.getFirstItem(feedXml);
        this.state = { };
        this.state.latestData = latest;
        this.state.timestamp = new Date();
        localStorage['latestBrew'] = JSON.stringify(this.state);
        this.renderLatest(latest);
      },
      renderLatest: function(latest){
        $('#main>h1').text(latest.title);
        $('#content').html(latest.content);
        this.todaysUrl = latest.url;
      },      
      getFirstItem: function(feedXml){
        var items = feedXml.evaluate("//channel/item", feedXml, 
                                 null, XPathResult.ANY_TYPE, null); 

        var item = items.iterateNext(); 
        if (item) {
          return this.createItem(item);
        }
      },      
      createItem: function(postXml) {
        return { 
          title: this.readElementText(postXml, 'title'),
          url: this.readElementText(postXml, 'feedburner:origLink'),
          content: this.readElementText(postXml, 'content:encoded')
        };
      },
      mapElements: function(contextElement, path, map){
        var result = [ ];
        var items = contextElement.ownerDocument.evaluate(path, contextElement, 
                                this.namespaceResolver, XPathResult.ANY_TYPE, null); 
        
        var item = items.iterateNext(); 
        var i = 0;
        while (item) {
          result.push( map(item, i++) );
          item = items.iterateNext();
        }

        return result;
      },      
      readElementText: function(contextElement, path){
        var results = contextElement.ownerDocument.evaluate(path, contextElement, 
                                   this.namespaceResolver, XPathResult.ANY_TYPE, null); 
        var first = results.iterateNext(); 

        if (first) {
          return first.textContent;
        }
      },      
      namespaceResolver: function(prefix) {
        if(prefix == 'content') {
          return 'http://purl.org/rss/1.0/modules/content/';
        }
        if(prefix == 'feedburner') {
          return 'http://rssnamespace.org/feedburner/ext/1.0';
        }
      }

    }
  }
};

Wow, that's a lot of JavaScript at once, right? Hopefully you'll notice that most of it is just to parse the RSS xml.

Only a few parts of this code deserve commentary. The refresh method (line 45) is the one that retrieves the RSS data. It uses the jQuery.get method to do so. Once the data arrives, it will invoke update, which will use the parsing methods to get an object representing the latest news item in the data.

      update: function(feedXml) {
        var latest = this.getFirstItem(feedXml);
        this.state = { };
        this.state.latestData = latest;
        this.state.timestamp = new Date();
        localStorage['latestBrew'] = JSON.stringify(this.state);
        this.renderLatest(latest);
      },

The above code also shows the use of two important APIs that Chrome implements. The localStorage is a way to persist information that lives in the client machine and lasts even after the browser closes. We use it to remeber our last results and avoid fetching and parsing the RSS each time the popup is opened.

The other API is the native JSON object that can replace any dedicated library we are used to have in cross-browser websites. We need to stringify the data because we can only save strings in the local storage.

With the parsed data at hand we just need to replace the content in those empty html tags in popup.html with the information we have.

Adding some life with events

The last piece of this puzzle are the jQuery event handlers that we created in the init method. They make some of the elements clickable, including the links, which open new tabs using chrome.tabs.create(). Also note starting on line 29 that if we find recent local data we use that instead of refreshing the content from the RSS feed.

Let's load this thing up

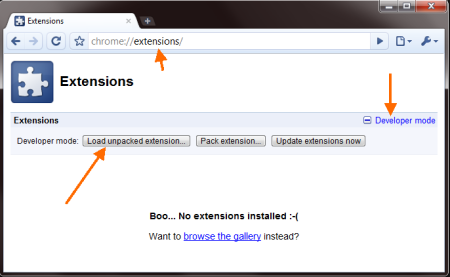
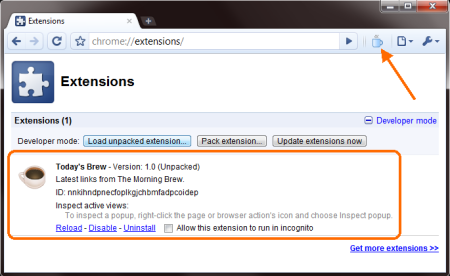
Now we just need to run it and see how it goes. Go to the extesions page, expand the Developer Mode area and click Load unpacked extension....

Then simply browse to your extension's directory and select it. The extension should now be listed as seen below.

While you're developing your extension you can debug it using the developer tools included in Chrome. To do that, right click the extension button and select Inspect popup.

You can download the code for this extension and play with it all you want. I'm still early into learning this so feel free to give me pointers or ask questions.

More on blocked files

Posted by Sergio on 2010-06-23

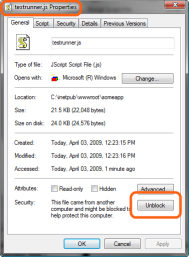
I've written about this before. You download a file to use in your web application, like a JavaScript library or an image file but the browser just can't seem to load it. You spend hours looking for a typo or broken link until you find out about that Unblock button and you realize that it's IIS that isn't serving the file. The file had been there; you had the correct URL all along; it's just disallowed.

I actually developed the reflex to right click and unblock each an every file I download now. It's stupid, isn't it? I should have imagined there was a way to disable that Windows feature instead of just learning how to live with the problem.

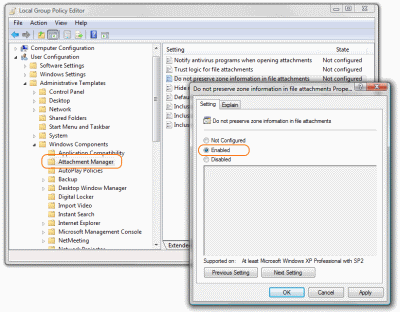
Well, no more. Here's how you can disable it. Credit goes to this article.

  • Run gpedit.msc (the group policy editor)
  • Go to User Configuration/Administrative Templates/Windows Components/Attachment Manager
  • Find the setting named Do not preserve zone information in file attachments and enable it
  • Log off then log back on, or update the current policies with: Gpupdate /force in any command prompt.

Note: If you're using Chrome it looks like there's some bug that may or may not be taken care of as you read this. Chrome doesn't seem to honor the policy setting and always mark the downloaded files as unsafe.

Now I just need to add this to the list of tasks anytime I get a new machine or repave one of them.

The Ground is Shaking Again. Get Mobile.

Posted by Sergio on 2010-06-17

A little over two years ago I commented how surprising it was that VisualBasic was still more popular than C# in the .Net world. Back then I checked the TIOBE Index and saw that VB (in all its flavors) enjoyed almost 11% of relevance while C# wasn't even at the 4% level.

When we look at the June 2010 rank below we see that C# has finally caught up with VB, and it's safe to say C# is now the most popular .Net language (remember, the VB index is not made up of just VB.NET.)

1Java18.03%
 
2C17.81%
 
3C++10.76%
 
4PHP8.93%
 
5(Visual) Basic5.87%
 
6C#5.20%
 
7Python4.27%
 
8Perl3.20%
 
9Objective-C2.47%
 
10Delphi2.39%
 
11JavaScript2.19%
 
12Ruby2.07%
 
13PL/SQL0.79%
 
14SAS0.70%
 
15Pascal0.70%
 
16Lisp/Scheme/Clojure0.65%
 
17Lua0.59%
 
18MATLAB0.59%
 
19ABAP0.58%
 
20PowerShell0.53%
 

Again, anyone can debate the importance of this ranking system, but at least it has been there for a while and to me it seems to represent the pulse of software development quite well.

Movers and shakers

But this post is not about C# vs. VB.NET.

This time around what caught my attention was the impressive rise of Objective-C (up 36 positions in one year). Now, no matter how more common Macs have become in the last few years, no one will convince me this increase in Objective-C is due to native OSX application development :)

Of course we all know it's caused by the surge in mobile and device app development (iPhone, iPad, and anything that they decide will run the iOS, like the AppleTV in the future, who knows?)

If you look at the trending chart on the TIOBE page you'll see that Objective-C started to gain significant steam around June of last year, coincidentally (maybe not?) when the iPhone 3GS was announced.

Keep your eyes on the ball

Are you playing with Mobile yet? Have you:

  1. Started reading about mobile development?
  2. Developed a Mobile web site?
  3. Written and tested a native app against a device emulator/VM (iPhone, Android, WebOS, WP7)?
  4. Written and deployed an app to your own mobile device?
  5. Published an app on the market?

It's not like you will find yourself out of a job if you don't get into mobile but for many developers, from software shops to corporate environments, sooner or later a request for a mobile product or a mobile version of an existing one will swing by your desk.

It's an exciting time. Once again you have the chance of taking the lead and play an important role in your team by staying ahead of the game. Remember when you started seeing request for Ajax and fancy UI's in your web applications. Remember how you were one of the few that knew anything about it in your team? Same thing here. Only much bigger.

What I'm looking into

There are two different fronts that interest me in mobile development: Native Android apps and Mobile Sites. I'll explain.

The time I spent in Objective-C and XCode in the past was enough for me to know I'd be grinding my teeth and blowing off steam every single day if I wanted to develop for the iPhone (it's probably just me, I can live with that admission.) Besides, I don't like the idea of an approval process before I can give away or sell my apps.

Windows Phone is something that I'll have to wait more and see what kind of traction it gains. It also has the approval process issue. The big plus will be the development tools, which I think will better than iPhone and Android.

All that, combined with the enormous momentum that Android has, made me start coding for Android when it comes to native apps.

Don't forget Mobile Web

Native mobile development is fun and rewarding but let's not kid ourselves. History shows that businesses will favor the simplicity of web development.

I went through that transition period when custom desktop application development quickly lost market to web applications. And that happened in a world where Windows was virtually in every workstation that mattered.

Now imagine the mobile scene, where there's more than one big player, none equivalent to what Windows was back in 1998. Do you really think anyone will want incur the cost of maintaining 3 or 4 different native versions of each mobile application that we will start cranking out like we do web apps today? Native apps will probably be the minority, for environments where you have the luxury of dictating your end-user's choice of mobile device.

Didn't we just spend the better part of the last 10 years trying to get out of a certain single-browser paradigm? Do we want to repeat that mistake?

Moving to HTML5

Why is HTML5 so important in Mobile and not as much in the standard Web yet? Well, for one there is a greater percentage of HTML5-capable browsers in Mobile than on the desktop browsers. Android, iPhone, WebOS (and soon BlackBerries) have WebKit browsers.

With things like richer forms, offline support, canvas, video and the Geo-Location API (not really HTML5 but present in those WebKit browsers) we can build really capable mobile web apps. Not just small screen versions of the regular web apps.

To be very straight forward about it, the way I personally see it is that HTML5 is where the bulk of the mobile development will happen in the Enterprise and consumer-facing applications.

Maybe something like Flash, AIR, or Silverlight makes a run for their mobile money too but with all the bullying from Apple and diverging opinions everywhere, that's not something I'm spending time on right now.

Native or Web?

Both. But definitely much more of the Web kind.