Git, SSH, PuTTY, GitHub, Unfuddle, the kitchen sink
After reading a good number of the guides for getting Git/ GitHub/ Unfuddle working correctly in Windows, I finally got it sorted out. I had to use a bunch of things I had not used before so I realized it's probably a good idea to share my findings, hoping to help someone else (and maybe myself again) in the future.
Local git is easier
Getting Git to run locally in Windows is not hard. It gets a little trickier when you want to work with remote repositories. Especially if, like me, you have little or no experience using SSH in Windows.
In this post I'll install and configure the tools that enable Git to work with remote repositories (e.g. post changes to a server), which I think is probably what a lot of people will want to do, even if you're just toying with Git or evaluating it.
You will need SSH for serious Gitting
The way Git will authenticate and communicate with hosted repositories like GitHub or Unfuddle is through an SSH tunnel. That means we will need an SSH client to connect to the server and Git will use that connection to securely transfer the repository data up and down.
In Linux or on the Mac, SSH is a trivial thing. It's just part of the default installation. For whatever reason, Windows does not come with an SSH client, so we need to find ourselves a 3rd party client.
PuTTY, a family of tools
Luckily for us, there's a free and very popular SSH client for Windows, called PuTTY. PuTTY is actually a family of utilities that play together to configure and establish SSH (and Telnet) connections.
From the PuTTY downloads
page get the following programs and put somewhere in your hard disk. I like to put these
types of things in a c:\tools\bin directory, which is included in my %PATH%.
Create your SSH key pair
The most common way to authenticate your SSH connection with the server is
using an RSA key pair. The
pair contains a public key and a private key. Typically these keys will be
stored in two files — make sure that the private key file is in a
directory location that only your user account has rights. I'm gonna
keep both files in %USERPROFILE%\SSH (type echo %USERPROFILE%
in a command window to see where yours is.)
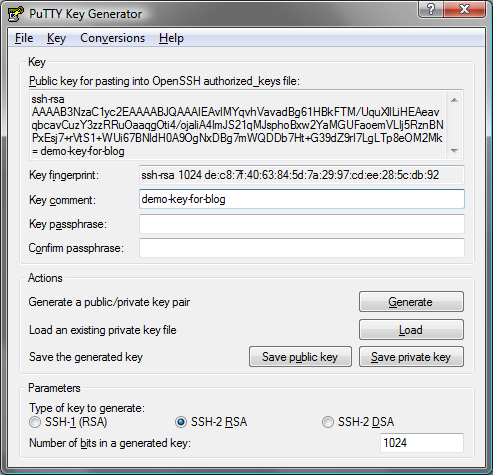
To create a key pair we will use puttygen.exe. Just click Generate and then
Save public key and Save private key. I chose to leave the password blank
and trust that my directory security is enough to protect my keys. Let's assume I saved
my keys at %USERPROFILE%\SSH\private.ppk and %USERPROFILE%\SSH\public.ppk,
respectively.
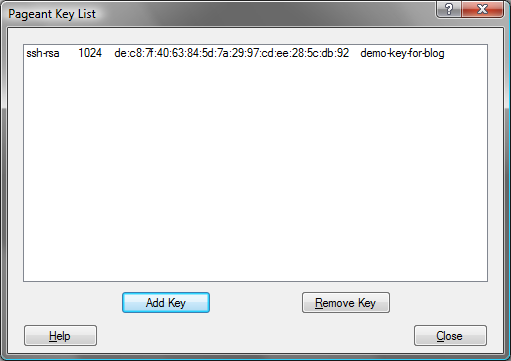
We're not done with PuTTY yet
Before starting an SSH connection with PuTTY, we need to run Pageant.exe. Pageant is a background process that will handle the authentication requests. We will add our private key(s) in Pageant and it will keep them available for new connections, without the need to retype the password (if you entered one) every single time.
Run Pageant.exe, double click its icon in the notification area, and add your private key file. If you specified a password, it will now prompt you for that.
Phew! We are done with the SSH crap. Now on to Git. Finally.
Git via msysgit
There are a few ways of installing the git client in Windows, including downloading and compiling the source. But guess if I want to go down that route. Instead, let's just press the easy button and use a pre-packaged installer.
msysgit is what you'll want to install. Donwload the latest release from the site. The file name of the full installer, as of this writing, will be named like Git-[version]-preview[yyyymmdd].exe.
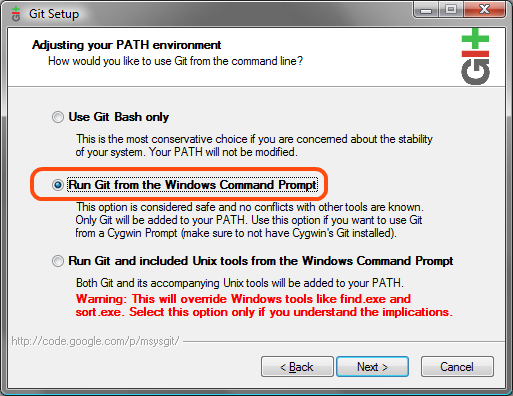
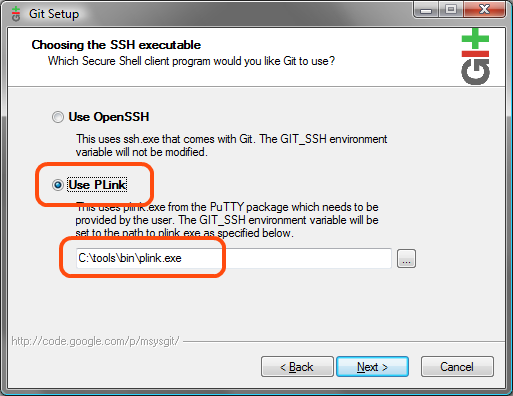
Run the installer accepting most of the defaults, with the exception of these two screens below. We want to Run Git from the Windows Command Prompt and Use PLink (PuTTY.)
After this we should have a working installation of Git. You should be able to use Git from both the Windows command prompt and from the Git Bash shell.
Register your public key with the remote server
Now we need to tell the server that hosts the remote repository that it should expect and accept SSH connections from our machine. The way we do this is similar in GitHub and Unfuddle. We just need to associate our public key with our account on that site.
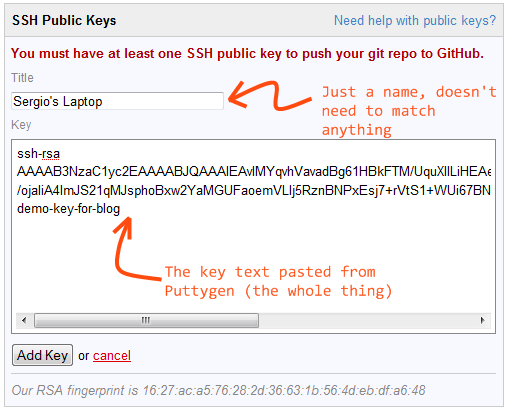
For example, in my GitHub account settings there's a section called SSH Public Keys, where we can add all public keys that we own. Don't use the public key straight from your PuTTY public key file, it uses a different format. Instead, open Puttygen again and load the private key. The public key, in the right format, will be shown in the big text box at the top of the window. Copy that entire text and paste in a new key in your GitHub settings, as seen below.
Troubleshooting
After all that you should have all it takes to use Git in Windows. Until I got to this point I came across some problems. Here are some of them.
No supported authentication methods available. I got that error while trying to push changes because I either forgot to run Pageant or to add the right key into it. The full error is below.
C:\myproject>git push origin master
FATAL ERROR: Disconnected: No supported authentication methods available
fatal: The remote end hung up unexpectedly
The server's host key is not cached in the registry. Sometimes when connecting to a remote server for the first time, the PuTYY will output this message after your Git command.
The server's host key is not cached in the registry. You
have no guarantee that the server is the computer you
think it is.
The server's rsa2 key fingerprint is:
ssh-rsa 1024 [fingerprint here]
If you trust this host, enter "y" to add the key to
PuTTY's cache and carry on connecting.
If you want to carry on connecting just once, without
adding the key to the cache, enter "n".
If you do not trust this host, press Return to abandon the
connection.
Store key in cache? (y/n)