Sergio and the sigil

Have you met arguments.callee?

Posted by Sergio on 2010-09-10

Just the other day I had a need to use arguments.callee and I realized that's not something you really see every day in JavaScript. Maybe I could talk about it a bit.

Anonymous functions everywhere

It's not news to anyone reading this blog that one of JavaScript's workhorses are anonymous functions. Callbacks, strategies, deferred execution, event handlers, etc. They just seem to be all over the place — and for a good reason; they can be convenient and reduce the pollution of a bunch functions that are only called from a single spot.

Another nice thing is that, once your eyes are trained to ignore the little bit of noise that they add to the code, the code is really readable and, dare I say it, expressive.

Yet another contrived example

Let's say we are really into reinventing the wheel and with our understanding of anonymous functions we create a revolutionary map function:

function map(array, compute){
  var result = [ ];
  for(var i=0; i < array.length; i++){
    result.push( compute(array[i]) );
  }
  return result;
}

This function, as you can hopefully see, transforms each element of the given array into something else and returns the array of the transformed elements. Two simple uses are shown below.

//apply discount
var prices = [1, 2, 3, 4];
var discount = 0.1; // 10% off today, w00t!
var newPrices = map(prices, function(price){ return (1-discount)*price; } );
//==> [0.9, 1.8, 2.7, 3.6]

//compute areas
var squareSides = [1, 2, 3, 4];
var squareAreas = map(squareSides, function(side){ return side*side; } );
//==> [1, 4, 9, 16]

I warned you the examples would be contrived, didn't I?

Now your product manager comes and asks for a page where the users can enter a list of numbers and get the factorials for each of them. You immediately think your friend the map function will save the day. You start and...

//return the factorials
var userNumbers = [1, 2, 3, 4];
var factorials = map(userNumbers, function(number){ 
  if(number <= 1) { return 1; }
  return number * ????????(number - 1); // ooops! I need to recurse here.
} );

You see, there's this thing with anonymous functions. They don't have a name, d'oh. As I said in the beginning, we typically use them in situations where they are called only once so we can inline them and forego the need fora name. But now we're kind of wishing they had a name.

Anonymity won't hide you from me

Well, if the post tittle didn't already give it away, we can achieve that with arguments.callee. Using arguments.callee inside a function gives us a reference to the function itself. So now we can finish our code.

//return the factorials
var userNumbers = [1, 2, 3, 4];
var factorials = map(userNumbers, function(number){ 
  if(number <= 1) { return 1; }
  return number * arguments.callee(number - 1);
  //or if you were using "this" in the function you'll probably want to:
  // return number * arguments.callee.apply(this, [number - 1]);
} );
//==> [1, 2, 6, 24]

A more real world scenario

I won't leave you without at least a reference to a real use case for this feature. The example I'll show comes from Nicholas Zakas. In a blog post a while ago he showed how we can break up long running tasks with smaller timed/deferred chunks, improving the browser's responsiveness.

Here's the function from his blog post, which process chunks of an array for 50ms, then stops and call itself back to process the remaining items soon after that — giving the browser a chance to breathe and take care of its interaction with the user

//Copyright 2009 Nicholas C. Zakas. All rights reserved.
//MIT Licensed
function timedChunk(items, process, context, callback){
   var todo = items.concat();   //create a clone of the original

  setTimeout(function(){

    var start = +new Date();

    do {
       process.call(context, todo.shift());
    } while (todo.length > 0 && (+new Date() - start < 50));

    if (todo.length > 0){
      setTimeout(arguments.callee, 25);
    } else {
      callback(items);
    }
  }, 25);
}

I hope this shows you a little new trick.

Chrome Extension Development

Posted by Sergio on 2010-06-28

Do you like JavaScript? Have you been looking for a reaon or an idea to learn and start using HTML5? Google Chrome extesions are a great way to get into HTML5 and all its new APIs with bite sized applications.

Anatomy of a Chrome Extension

A Chrome extesion is nothing more than a tiny website that runs hosted inside Chrome. Like any website, it consists of regular web components. Grossly simplifying it is just a directory full of files, such as JavaScript, CSS, images, HTML5, and anything else you usually add to a web page.

Because it runs inside the browser, you have access to things like browser events, browsing history, and open tabs.

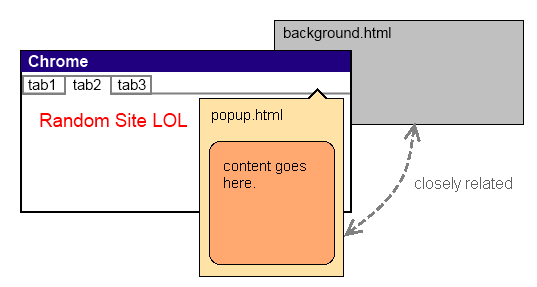
Essentially, your extension gets loaded as an HTML page called background.html where you can put any common/global functions and variables. This page is never visible and even if you don't provide a background.html in your extension, Chrome will load an empty one for you. All other pages in your extension can access the background page's functions.

Here's a diagram of a common scenario.

Today's Brew

Our sample extension will be something simple but that at the same time will let us explore interesting aspects of extensions development, namely local storage and cross-domain requests.

The sample is also a hat tip to the valuable work Chris Alcock does with his The Morning Brew, collecting some of the best links for all of us.

What we will do here is create an extension that will show us his latests links at the click of a button.

Introduce yourself

The extension needs to inform Chrome a few details about itself, such as name, default icons, along with any permissions it requests to access privileged browser features. This is done through the manifest file, which is just a JSON document. Here's our manifest file, aptly named manifest.json.

{
  "name": "Today's Brew",
  "version": "1.0",
  "description": "Latest links from The Morning Brew.",
  "icons": { 
    "48": "icon48.png",
    "128": "icon128.png" 
  },
  "browser_action": {
    "default_icon": "icon.png",
    "default_popup": "popup.html"
  },
  "permissions": [
    "http://feeds.feedburner.com/",
    "tabs"
  ]
}

What you can do

Extensions can perform several different jobs, like showing notifications, providing new themes, changing some of the default Chrome pages, etc. One other thing they can do are the browser actions, which basically means adding a button to the toolbar that acts independent of what page is being shown, as if it were just another browser feature.

If you look at our manifest file you'll notice we declared a browser_action, with its icon and the page it opens wen clicked.

Our extension does not have a custom background page, we will just rely on the default one Chrome will give us and put all of our logic in the popup page that we will open.

What you need to do that

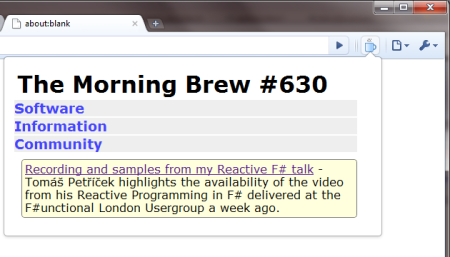
Here's how our extension will look like when we're done.

In our extension, other than manipulating our own extension's HTML dynamically (which doesn't require any special permissions) we will need to fetch the RSS feed from Feedburner and eventually open new tabs as the user clicks on the links.

That's what you can see in the permissions section of the manifest file above.

Getting down to business

To create our extension we start by creating an empty directory and adding our manifest.json file and all the icon image files that we mentioned in that manifest file.

Then we create our popup.html file, which will be pretty empty and will be populated with the content we will retrieve from the RSS feed. Here's that file.

<script type="text/javascript" src="jquery.js"></script>
<script type="text/javascript" src="popup.js"></script>
<div id="main">
  <h1></h1>
  <div id="content">
  </div>
</div>

As you can see, we will be using jQuery so we should also add that file to our directory. We will leave all the beautification of the popup in the popup.css file, which I won't bother showing here; you can download it along with the rest of the code at the end of this article.

The other file referenced by the HTML is popup.js. That's where all the action happens.

$(document).ready(function(){
  SERGIOPEREIRA.samples.todaysBrew.init();
});

var SERGIOPEREIRA = {
  samples: {
    todaysBrew: {
      state: { },
      feedUrl: 'http://feeds.feedburner.com/ReflectivePerspective?format=xml',
      todaysUrl: '',
      maxAgeHours: 12, // keep it for 12 hours
      
      init: function(){
        $('#content h3').live('click', function(){
          $('#content ul:visible').slideUp();
          $(this).next().slideToggle();
        });

        $('#content li a').live('click', function(){
          $('#content ul:visible').slideUp();
          chrome.tabs.create({url: this.href});
        });

        $('h1').click(function(){
          chrome.tabs.create({url: SERGIOPEREIRA.samples.todaysBrew.todaysUrl});
        });
        
        if(typeof chrome != 'undefined') {
          this.state = localStorage.getItem('latestBrew');

          if(this.state){
            var now = new Date();
            var minTimestamp = new Date();
            minTimestamp.setHours(minTimestamp.getHours() - this.maxAgeHours);
            minTimestamp = minTimestamp.toJSON();

            if(this.state.timestamp > minTimestamp) {
              this.renderLatest(this.state.latestData);
              return;
            }
          }
          this.refresh();
        }
      },
      refresh: function(){
        console.log('will get feed data...');
        $.get(this.feedUrl, function(xml, status, xhr){
          SERGIOPEREIRA.samples.todaysBrew.update(xml);
        });
      },
      update: function(feedXml) {
        var latest = this.getFirstItem(feedXml);
        this.state = { };
        this.state.latestData = latest;
        this.state.timestamp = new Date();
        localStorage['latestBrew'] = JSON.stringify(this.state);
        this.renderLatest(latest);
      },
      renderLatest: function(latest){
        $('#main>h1').text(latest.title);
        $('#content').html(latest.content);
        this.todaysUrl = latest.url;
      },      
      getFirstItem: function(feedXml){
        var items = feedXml.evaluate("//channel/item", feedXml, 
                                 null, XPathResult.ANY_TYPE, null); 

        var item = items.iterateNext(); 
        if (item) {
          return this.createItem(item);
        }
      },      
      createItem: function(postXml) {
        return { 
          title: this.readElementText(postXml, 'title'),
          url: this.readElementText(postXml, 'feedburner:origLink'),
          content: this.readElementText(postXml, 'content:encoded')
        };
      },
      mapElements: function(contextElement, path, map){
        var result = [ ];
        var items = contextElement.ownerDocument.evaluate(path, contextElement, 
                                this.namespaceResolver, XPathResult.ANY_TYPE, null); 
        
        var item = items.iterateNext(); 
        var i = 0;
        while (item) {
          result.push( map(item, i++) );
          item = items.iterateNext();
        }

        return result;
      },      
      readElementText: function(contextElement, path){
        var results = contextElement.ownerDocument.evaluate(path, contextElement, 
                                   this.namespaceResolver, XPathResult.ANY_TYPE, null); 
        var first = results.iterateNext(); 

        if (first) {
          return first.textContent;
        }
      },      
      namespaceResolver: function(prefix) {
        if(prefix == 'content') {
          return 'http://purl.org/rss/1.0/modules/content/';
        }
        if(prefix == 'feedburner') {
          return 'http://rssnamespace.org/feedburner/ext/1.0';
        }
      }

    }
  }
};

Wow, that's a lot of JavaScript at once, right? Hopefully you'll notice that most of it is just to parse the RSS xml.

Only a few parts of this code deserve commentary. The refresh method (line 45) is the one that retrieves the RSS data. It uses the jQuery.get method to do so. Once the data arrives, it will invoke update, which will use the parsing methods to get an object representing the latest news item in the data.

      update: function(feedXml) {
        var latest = this.getFirstItem(feedXml);
        this.state = { };
        this.state.latestData = latest;
        this.state.timestamp = new Date();
        localStorage['latestBrew'] = JSON.stringify(this.state);
        this.renderLatest(latest);
      },

The above code also shows the use of two important APIs that Chrome implements. The localStorage is a way to persist information that lives in the client machine and lasts even after the browser closes. We use it to remeber our last results and avoid fetching and parsing the RSS each time the popup is opened.

The other API is the native JSON object that can replace any dedicated library we are used to have in cross-browser websites. We need to stringify the data because we can only save strings in the local storage.

With the parsed data at hand we just need to replace the content in those empty html tags in popup.html with the information we have.

Adding some life with events

The last piece of this puzzle are the jQuery event handlers that we created in the init method. They make some of the elements clickable, including the links, which open new tabs using chrome.tabs.create(). Also note starting on line 29 that if we find recent local data we use that instead of refreshing the content from the RSS feed.

Let's load this thing up

Now we just need to run it and see how it goes. Go to the extesions page, expand the Developer Mode area and click Load unpacked extension....

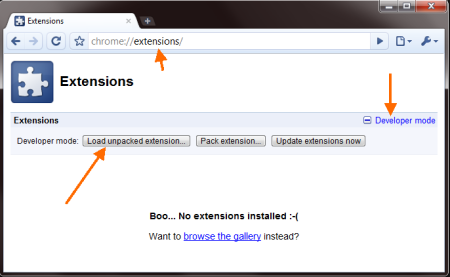
Then simply browse to your extension's directory and select it. The extension should now be listed as seen below.

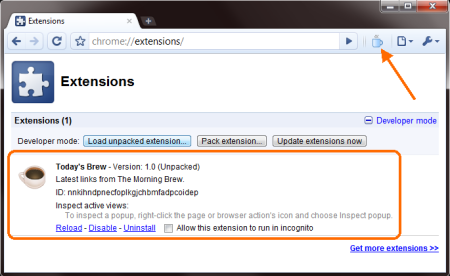
While you're developing your extension you can debug it using the developer tools included in Chrome. To do that, right click the extension button and select Inspect popup.

You can download the code for this extension and play with it all you want. I'm still early into learning this so feel free to give me pointers or ask questions.

ANN: The Second Chicago Code Camp

Posted by Sergio on 2010-03-22

After a successful first Chicago Code Camp last year, we're back to announce the second edition of this unique technical event.

The Chicago Code Camp 2 will happen on May 1st. In this event we are addressing one obvious and recurring feedback: Make it closer to the city.

We're thrilled to announce that our Code Camp will take place at the IIT Campus, just South of downtown Chicago, easily accessible by car and public transportation.

What is the Chicago Code Camp?

Just like last year, we want to host an event where any platform or programming language can have its space, as long as there's community interest in talking and hearing about it.

The code camp is a great opportunity to learn about and network with developers of different walks of life and technologies. Last year we had diverse topics such as .NET, Python, iPhone, Ruby, XUL, JavaScript, Scala, etc. We hope to have even more this time around.

To ensure the numerous technical communities are fairly represented, we are inviting all local technical community leaders to get involved and provide speakers and attendees.

The event is free to attend but everyone needs to register. Registration will open soon Registration is open and it's limited due to the venue capacity.

Call for Speakers

The Chicago Code Camp website is up and ready to receive talk proposals.

The Code Camp Manifesto calls for sessions that privilege code over theory or slides, but it doesn't mean a good presentation will be immediately turned down because of that.

Stay tuned

We will have more exciting news and announcements to share about this event. We will do so as soon are they are confirmed.

Keep an eye on the website (or this blog) to learn about registrations, volunteering, and getting involved.

jQuery Custom Element and Global Events

Posted by Sergio on 2010-02-21

This last week I learned a new thing about jQuery custom events, particularly the ones of global nature. There's good documentation and examples about custom element events, but not much for the global ones.

Why do we need custom events?

Custom events make it easier to keep complex pages under control. They are a pillar for loosely-coupled UI scripts. Let's start with a simple example.

Suppose we have a fairly complex and dynamic page where many elements are Ajax-editable, using in-place editors or any other approach that posts updates to the server. Depending on how quickly the server responds to the request, there's a chance the user can start another simultaneous request before the first one finishes, maybe even seeing inconsistent results, by clicking a button too soon.

In our example — a fraction of what a real complex page would be — what we want to do is disable some of these buttons while the data is being changed, and re-enable them once we hear back from the server.

Click the field to edit it:<br>

<input type="text" readonly="readonly" id="email" name="email"
   value="joe@doe.com" style="background-color: #eee;"/> 

<input type="button" class="userOperation" id="sendButton" value="Send Message">
<input type="button" class="userOperation" id="summaryButton" value="Summary">

Custom Element Events

Let's tackle this problem first with the custom element events. Below is a summary of how these custom events are used.

$('#publisher').trigger('eventName');

$('#publisher1').bind('eventName', function() {
   //eventName happened. React here.
   $('#subscriber1').doStuff();
   $('#subscriber2').doOtherStuff();
   // more...
});

In this case we will make the elements being edited announce that they entered edit mode so that any other element can act on that announcement.

$('#email').
click(function(){
	$(this).removeAttr('readonly').css({backgroundColor: ''});
	$(this).trigger('editStart');
}).
blur(function(){
	$(this).attr('readonly', 'readonly').css({backgroundColor: '#eee'});
	$.post('/updateEmail', $('#email').serialize(), function() {
		$(this).trigger('editComplete');
	});
}).
bind('editStart', function(){
	// "this" is the #email element
	console.log('edit started, this =  ' + this.id);
	$('.userOperation').attr('disabled', 'disabled');
}).
bind('editComplete', function(){
	// "this" is the #email element
	console.log('edit complete, this =  ' + this.id);
	$('.userOperation').removeAttr('disabled');		
});

$('#sendButton').click(function(){
	//code to send a message
	alert('Message sent');
});

$('#summaryButton').click(function(){
	//code to generate summary
	alert('Summary created');
});

This approach works well in the beginning but gets really ugly as more elements need to publish their own similar events or when other new elements need to do somethings with these events too. We will need to bind handlers to all these element's events and the code inside these handlers will start getting longer and probably too far from the rest of the code that relates to it.

One step forward with page level events

Since the events we are producing here really reflect the document state more than any individual field's state, let's move that event to a more top level element, namely the body element:

$('#email').
click(function(){
	$(this).removeAttr('readonly').css({backgroundColor: ''});
	$('body').trigger('editStart');
}).
blur(function(){
	$(this).attr('readonly', 'readonly').css({backgroundColor: '#eee'});
	$.post('/updateEmail', $('#email').serialize(), function() {
		$('body').trigger('editComplete');
	});
});

$('body').
bind('editStart', function(){
	// "this" is the body element
	console.log('edit started, this =  ' + this.tagName);
	$('.userOperation').attr('disabled', 'disabled');
}).
bind('editComplete', function(){
	// "this" is the body element
	console.log('edit complete, this =  ' + this.tagName);
	$('.userOperation').removeAttr('disabled');		
});

$('#sendButton').click(function(){
	//code to send a message
	alert('Message sent');
});

$('#summaryButton').click(function(){
	//code to generate summary
	alert('Summary created');
});

Now we're getting somewhere. We reduced the number of event sources to just one, so guaranteed less duplication. But it still has some shortcomings.

The code is still bound to a different element than the one we want to operate on. What I mean by that is that the event handlers are in the context of the elements publishing the event and the code in the handlers is typically geared towards the elements that need to react to that event, that is, the this keyword is less useful than in most of your common event handlers.

The pattern of these page-level events is:

$('body').trigger('eventName');

$('body').bind('eventName', function() {
   //eventName happened. React here.
   $('#subscriber1').doStuff();
   $('#subscriber2').doOtherStuff();
   // more...
});

But wait, jQuery has real global events too

I had settled down with using the above style of global events until someone at work pointed out that there's another way of doing this, which unfortunately isn't as well discussed: the custom global events.

Here's our code using global custom events:

$('#email').click(function(){
	$(this).removeAttr('readonly').css({backgroundColor: ''});
	$.event.trigger('editStart');
}).blur(function(){
	$(this).attr('readonly', 'readonly').css({backgroundColor: '#eee'});
	$.post('/updateEmail', $('#email').serialize(), function() {
		$.event.trigger('editComplete');
	});
});

$('.userOperation').bind('editStart', function(){
	// "this" is a .userOperation button
	console.log('edit started, button: ' + this.id);
	$('.userOperation').attr('disabled', 'disabled');
}).bind('editComplete', function(){
	// "this" is a .userOperation button
	console.log('edit complete, button: ' + this.id);
	$('.userOperation').removeAttr('disabled');		
});

$('#sendButton').click(function(){
	//code to send a message
	alert('Message sent');
});

$('#summaryButton').click(function(){
	//code to generate summary
	alert('Summary created');
});

What is great about this type of event is that they are in the context of the subscribing elements, as if these elements were the publishers of the event, much like the majority of the event handling code we write.

They also allow us to move more code next to the other event handler for the subscribing elements, and even chain them all together. As an example, let's modify the event handlers of the #sendButton element to add some different behavior when the editStart event happens.

$('#sendButton').click(function(){
	//code to send a message
	alert('Message sent');
}).bind('editStart', function(){
	// "this" is the #sendButton button
	this.value = 'Send message (please refresh)';
	// change the click event handler.
	$(this).unbind('click').click(function(){
		alert('Sorry, refresh page before sending message');
	});
});

And here is the simplified representation of the global events code.

$.event.trigger('eventName');

$('#subscriber1').bind('eventName', function() {
   //eventName happened. React here.
   $(this).doStuff();
});

$('#subscriber2').bind('eventName', function() {
   //eventName happened. React here.
   $(this).doOtherStuff();
});
//more...

Conclusion

Event-based programming is the usual way we write UI code. By understanding the different types of events that jQuery provides we can allow our UI to grow without getting into a messy nightmare of event handling code scattered all over the place.

Guided Tour: jQuery - Array wannabes

Posted by Sergio on 2009-12-22
This post is part of a series called the Guided Tours.

In this second installment we are still looking inside the jQuery code. Trust me, even if it's hard to digest, you can still learn enough if you focus on a little bit at a time.

The code we are interested in today is the following.

//from jQuery 1.3.2
get: function( num ) {
	return num === undefined ?

		// Return a 'clean' array
		Array.prototype.slice.call( this ) : 

		// Return just the object
		this[ num ];
},

That's the code for the command jQuery.fn.get(index), which returns the element at the given index or the entire array if the index is omitted.

The JavaScript idiom that is really interesting in this function is that strangely long function call Array.prototype.slice.call( this ).

That line is needed because we need to return an array and, even though they look like one, the jQuery objects aren't arrays. And they aren't alone in that.

If it walks like a duck...

The Array object is one that we can't avoid becoming familiar with in JavaScript. They are everywhere. Data is passed to functions as arrays. Data is returned in arrays. Or are they?

Aside from jQuery objects there are at least two other important occurrences of data structures that are used like arrays but really aren't: the arguments variable and the DOM NodeList collections.

The arguments variable is the list of parameters passed to the current function and the NodeList is what is returned from members of the the DOM API such as document.getElementsByTagName() or element.childNodes. Both of these types have a length property and expose their items with indices, like arguments[1] or elements[0].

But don't let this small coincidence fool you. As soon as you stop paying attention and try to use another array method, like push, shift, join you'll have your dreams shattered and a TypeErrorto handle.

Help me, jQuery

To solve the above problem and return a real array object instead of the jQuery object itself, the code used the technique we highlighted.

Array.prototype.slice.call( this )

The idea is to use the array.slice() instance method to create a new array. The slice method returns a chunk of the array and it takes two optional parameters (the boundaries) that, when omitted, make the function return a copy of the array itself.

I've written about the prototype object